Understanding antecubital fossa anatomy, a crucial element in phlebotomy, directly impacts the success rates of blood draws. The Clinical and Laboratory Standards Institute (CLSI) guidelines dictate best practices for identifying appropriate vein sites used in phlebotomy. Skilled practitioners at institutions like the American Medical Technologists (AMT) emphasize accurate palpation techniques. Indeed, the median cubital vein, a frequently targeted site, benefits from proficiency in these skills, leading to improved patient outcomes and reduced complications during venipuncture.
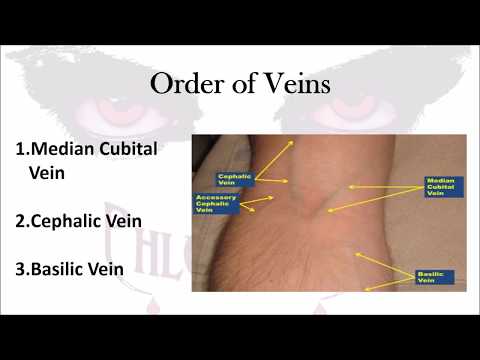
Image taken from the YouTube channel Phlebotomy Solutions , from the video titled Phlebotomy: The Order of Veins .
The Phlebotomist’s Crucial Role in Healthcare
Phlebotomists are the unsung heroes of modern medicine.
While often working behind the scenes, their expertise is absolutely fundamental to accurate diagnoses, effective treatment plans, and ultimately, positive patient outcomes.
The seemingly simple act of drawing blood is, in reality, a complex skill that demands precision, knowledge, and unwavering commitment to patient safety.
The Indispensable Link in Diagnostic Testing
Consider the sheer volume of diagnostic tests that rely on blood samples.
From routine check-ups to complex investigations, blood analysis forms the cornerstone of medical decision-making.
Phlebotomists are the crucial first step in this process.
Their ability to obtain high-quality samples directly impacts the reliability of test results.
Inaccurate or compromised samples can lead to misdiagnoses, delayed treatment, and potentially adverse consequences for the patient.
The phlebotomist is, therefore, not merely a technician, but an integral part of the diagnostic team.
Precision and Best Practices: Cornerstones of Phlebotomy
The phlebotomy profession requires strict adherence to established protocols and best practices.
Every step, from patient identification to sample labeling, must be executed with meticulous care.
This commitment to precision minimizes the risk of errors and ensures the integrity of the entire testing process.
Moreover, phlebotomists must remain up-to-date with the latest guidelines and techniques.
Continuing education and professional development are essential for maintaining competency and delivering the highest standards of care.
The consequences of neglecting best practices can be severe, ranging from inaccurate test results to patient injury and potential legal ramifications.
Mastering Vein Site Selection and Techniques
This article delves into the critical aspects of vein site selection and the techniques necessary for successful venipuncture.
We aim to provide a comprehensive guide that empowers healthcare professionals to confidently and competently perform this vital procedure.
The following sections offer practical insights and evidence-based strategies to improve your phlebotomy skills.
By mastering vein site selection and refining your technique, you contribute directly to enhanced patient care.
Precision and best practices are undeniably the cornerstones of phlebotomy, guiding every action from patient interaction to sample handling. Before we delve into the techniques, it’s crucial to understand where we’re aiming. This brings us to the antecubital fossa, the primary target in venipuncture.
The Antecubital Fossa: Your Primary Venipuncture Target
The antecubital fossa, that shallow depression located on the anterior aspect of the elbow, is the phlebotomist’s most frequent and, generally, preferred venipuncture site. Understanding its anatomy and the characteristics of the veins within is paramount to successful and safe blood collection.
Why the Antecubital Fossa?
Several factors contribute to the antecubital fossa’s suitability for venipuncture:
-
Accessibility: The veins in this area are relatively superficial, making them easier to locate and access.
-
Size: These veins are typically larger in diameter than those found in other areas, facilitating easier needle insertion and blood flow.
-
Support: The surrounding tissue provides support, helping to stabilize the vein during the procedure and reduce the likelihood of rolling.
-
Patient Comfort: Generally, venipuncture in the antecubital fossa is well-tolerated by patients, minimizing discomfort and anxiety.
Anatomy of the Antecubital Fossa: A Vein Map
The antecubital fossa houses three primary veins that phlebotomists commonly target: the median cubital, the cephalic, and the basilic. Each vein possesses distinct characteristics that influence its suitability for venipuncture.
The Median Cubital Vein: The First Choice
The median cubital vein is often considered the vein of choice within the antecubital fossa.
It typically runs diagonally across the fossa, connecting the cephalic and basilic veins. Its advantages include:
-
Well-Supported: It is anchored by surrounding tissue, reducing the risk of rolling during needle insertion.
-
Easily Accessible: Its superficial location and relatively large diameter make it easy to locate and puncture.
-
Patient Comfort: Puncture of the median cubital vein is usually well-tolerated, minimizing patient discomfort.
The Cephalic Vein: A Viable Alternative
The cephalic vein runs along the lateral side of the forearm and upper arm. While not always as prominent as the median cubital, it serves as a suitable alternative when the median cubital is unsuitable or inaccessible.
Key characteristics of the cephalic vein include:
-
Location: It is located on the thumb side of the arm.
-
Visibility: It may be more visible in some individuals, particularly those with less subcutaneous fat.
-
Potential for Rolling: It can sometimes be prone to rolling, requiring careful stabilization during venipuncture.
The Basilic Vein: Proceed with Caution
The basilic vein runs along the medial side of the forearm and upper arm. While it may appear large and accessible, its use requires careful consideration due to its proximity to nerves and the brachial artery.
Important considerations when considering the basilic vein include:
-
Nerve Proximity: The median cutaneous nerve of the forearm runs close to the basilic vein, increasing the risk of nerve damage during venipuncture.
-
Artery Proximity: The brachial artery lies deep to the basilic vein. Inadvertent arterial puncture can lead to hematoma formation and other complications.
-
Increased Pain: Due to its location and proximity to nerves, venipuncture of the basilic vein can be more painful for the patient.
-
Phlebotomist Skill: The basilic vein should only be used by experienced phlebotomists who are confident in their ability to avoid complications.
The selection of an appropriate venipuncture site hinges not only on anatomical knowledge but also on the mastery of specific techniques that ensure successful vein access and minimize patient discomfort. Let’s explore the fundamental phlebotomy techniques that empower phlebotomists to confidently locate, assess, and prepare veins for blood collection.
Mastering Essential Phlebotomy Techniques for Vein Access
The art of phlebotomy extends far beyond simply inserting a needle into an arm. It requires a delicate balance of skill, knowledge, and patient care. Successful vein access depends on a phlebotomist’s proficiency in several essential techniques, including vein palpation, informed vein selection, proper tourniquet application, antiseptic technique, and strategic patient positioning. Mastering these techniques significantly enhances the likelihood of a smooth and successful blood draw.
Vein Palpation: The Art of "Feeling" for Success
While visual inspection offers clues, palpation, or feeling the vein, provides critical information about its depth, size, resilience, and overall suitability for venipuncture. This tactile assessment allows the phlebotomist to identify veins that might not be immediately visible.
To effectively palpate:
- Use the index finger: Gently probe the antecubital area, applying light pressure.
- Avoid using the thumb: The thumb has a pulse of its own, which can be confusing.
- Feel for rebound: A good vein will feel spongy and "bounce" back when pressed.
- Assess depth and direction: Determine how deep the vein lies and its path beneath the skin.
By carefully palpating, the phlebotomist can differentiate between veins, tendons, and arteries, ensuring accurate needle placement.
Vein Selection Criteria: Choosing the Right Target
Not all veins are created equal. A phlebotomist must consider several factors when selecting a vein for venipuncture:
- Size: Larger veins are generally easier to access and provide better blood flow.
- Location: Avoid areas near nerves, arteries, or injured tissue.
- Condition: Choose veins that are healthy, intact, and free from scarring or bruising.
- Depth: Superficial veins are preferable to deeper ones.
- Patient-specific considerations: Factors like age, medical history, and skin condition can influence vein selection.
Prioritizing these criteria ensures a safer, more comfortable experience for the patient and a more successful blood collection.
Tourniquet Application: Enhancing Vein Visibility
A tourniquet is used to temporarily restrict venous blood flow, causing the veins to distend and become more prominent. Correct application is crucial for optimal vein visualization and access.
Key considerations include:
- Placement: Position the tourniquet 3-4 inches above the intended venipuncture site.
- Tightness: It should be tight enough to impede venous flow but loose enough to allow arterial flow.
- Duration: Leave the tourniquet in place for no more than one minute to prevent hemoconcentration.
- Release: Remove the tourniquet before removing the needle to minimize bleeding and hematoma formation.
Proper tourniquet application can significantly improve vein visibility and accessibility, simplifying the venipuncture process.
Antiseptic Technique: Maintaining a Sterile Field
Preventing infection is paramount in phlebotomy. Proper antiseptic technique is essential for maintaining a sterile field and protecting both the patient and the phlebotomist.
The standard procedure involves:
- Cleaning the site: Using a sterile alcohol swab (typically 70% isopropyl alcohol).
- Application technique: Applying the antiseptic in a circular motion, moving outward from the intended puncture site.
- Air drying: Allowing the antiseptic to air dry completely (typically 30-60 seconds) before needle insertion. Do not blow on or fan the area to speed up the drying process, as this can reintroduce microorganisms.
Adhering to this protocol minimizes the risk of introducing bacteria into the puncture site and causing infection.
Patient Positioning: Optimizing Comfort and Access
Proper patient positioning can significantly impact vein access and overall patient comfort.
Considerations include:
- Support: Ensure the patient’s arm is fully supported on a stable surface.
- Extension: The arm should be extended and slightly hyperextended at the elbow to maximize vein visibility.
- Comfort: Make sure the patient is comfortable and relaxed to minimize anxiety and muscle tension.
- Accessibility: Position the patient so the phlebotomist has easy access to the chosen venipuncture site.
Strategic patient positioning promotes relaxation, enhances vein visibility, and facilitates a smoother, more comfortable blood draw.
Needle Insertion and Blood Collection: A Step-by-Step Guide
With the vein located, prepped, and ready, the phlebotomist now embarks on the crucial phases of needle insertion and blood collection. Success here hinges on precision, technique, and an understanding of potential complications, making this stage a true test of skill and knowledge.
Selecting the Right Needle: Gauge and Type
Choosing the appropriate needle is paramount for patient comfort and sample integrity. Needle gauge, measured in G, refers to the diameter of the needle bore. A higher gauge number indicates a smaller bore.
For most adult venipunctures, a 21G or 22G needle is standard. These gauges provide a good balance between minimizing trauma to the vein and ensuring adequate blood flow.
Larger gauge needles (e.g., 18G or 20G) may be necessary for patients with larger, more robust veins, or when collecting large volumes of blood. However, they increase the risk of hematoma formation.
Smaller gauge needles (e.g., 23G or 25G) are sometimes used for elderly patients or those with fragile veins. However, they may increase the risk of hemolysis (rupture of red blood cells) due to the increased force required to draw blood through the smaller bore.
Needle type is also a factor. Multi-sample needles, used with evacuated tube systems (Vacutainers), have a retractable sleeve that allows for multiple tubes to be filled without removing the needle from the vein.
Butterfly needles (winged infusion sets) are often used for patients with difficult veins or for hand draws. They offer greater flexibility and control, but also have a higher risk of needlestick injury.
Mastering the Insertion Angle
The angle at which the needle enters the vein significantly affects both patient comfort and the success of the draw. The optimal insertion angle is typically between 15 and 30 degrees.
A shallower angle increases the risk of the needle sliding along the top of the vein without actually entering it.
A steeper angle increases the risk of passing completely through the vein.
The ideal angle will depend on the depth of the vein and the size of the needle. Always observe the "flash" of blood in the needle hub as an indicator of successful entry into the vein lumen.
Utilizing Blood Collection Tubes (Vacutainers)
Vacutainers streamline blood collection. These evacuated tubes are color-coded and contain specific additives that preserve the blood for particular tests.
To use them effectively:
- Insert the Vacutainer into the holder.
- Gently push the tube forward until the needle pierces the stopper.
- Allow the tube to fill completely until the vacuum is exhausted.
It’s crucial to follow the correct order of draw. This prevents cross-contamination of additives between tubes, which can affect test results. Gently invert each tube several times after filling to mix the blood with the additive.
Overcoming Common Challenges
Even with perfect technique, challenges can arise. Here’s how to address two common issues: rolling and collapsing veins.
Rolling Veins: Stabilization is Key
Rolling veins are veins that move or slip away from the needle upon insertion, which is especially common in elderly patients or those with fragile veins.
To stabilize a rolling vein:
- Use the thumb of your non-dominant hand to anchor the vein tautly below the insertion site.
- Apply gentle but firm pressure to prevent the vein from moving laterally.
Another helpful technique is to use a "two-handed" approach, using one hand to anchor the vein and the other to insert the needle. In some cases, using a butterfly needle can provide more control and reduce the risk of rolling.
Collapsing Veins: Gentle Aspiration
A collapsing vein occurs when the vein walls flatten during blood draw due to excessive suction. This is often caused by applying too much vacuum too quickly, especially when using larger evacuated tubes on fragile veins.
To prevent vein collapse:
- Use a smaller gauge needle to reduce the flow rate.
- Consider using a syringe instead of an evacuated tube, which allows for more controlled aspiration.
- Apply gentle, intermittent pressure to the plunger of the syringe to draw blood slowly.
If the vein begins to collapse, release the tourniquet immediately. You can also try lowering the collection tube below the level of the insertion site. This may allow gravity to assist blood flow.
The antecubital fossa remains the primary target for venipuncture, but there are situations where accessing veins in this area is not feasible or advisable. In these instances, phlebotomists must be prepared to navigate special situations and utilize alternative sites, all while upholding the highest standards of patient safety and care.
Navigating Special Situations and Alternative Sites
While the antecubital fossa is the go-to location for venipuncture, proficiency in phlebotomy extends beyond this primary site. Successfully navigating challenging scenarios and knowing when and how to utilize alternative sites are critical skills for any phlebotomist. This includes understanding the intricacies of drawing blood from dorsal metacarpal veins, preventing hematomas, adhering to stringent infection control guidelines, and mastering the art of effective patient communication.
Dorsal Metacarpal and Hand Veins: An Alternative Approach
When antecubital veins are inaccessible due to scarring, obesity, or other conditions, the dorsal metacarpal veins in the hand offer a viable alternative.
These veins, while smaller and potentially more fragile, can be accessed with careful technique.
Selecting the Right Needle is particularly important here.
A 23G or 25G butterfly needle is generally recommended to minimize trauma to these delicate veins.
Proper anchoring of the vein is also essential to prevent rolling, and gentle aspiration is crucial to avoid collapse.
It is critical to remember that hand veins can be more sensitive.
Thus, explaining the procedure clearly and proceeding with extra caution are paramount.
Hematoma Prevention: Minimizing Patient Discomfort and Complications
A hematoma, a collection of blood outside the vessel, is a common complication of venipuncture.
It occurs when blood leaks into the surrounding tissue, causing swelling, bruising, and discomfort.
Direct pressure applied immediately after needle removal is the most effective way to prevent hematoma formation.
The pressure should be firm and continuous for at least five minutes, or longer if the patient is on anticoagulant medication.
Careful vein selection also plays a significant role.
Avoid veins that are small, fragile, or located near bony prominences.
Gentle technique during needle insertion and blood collection can also minimize trauma to the vessel wall.
Instructing the patient to avoid heavy lifting or strenuous activity with the arm for at least an hour after the procedure can further reduce the risk of hematoma formation.
OSHA Guidelines and Infection Control: Protecting Patients and Healthcare Workers
Infection control is a cornerstone of safe phlebotomy practice.
Adherence to OSHA (Occupational Safety and Health Administration) guidelines is not merely a regulatory requirement; it is an ethical imperative to protect both patients and healthcare workers from the risk of infection.
Hand hygiene is the single most important measure for preventing the spread of infection.
Phlebotomists must wash their hands thoroughly with soap and water or use an alcohol-based hand sanitizer before and after each patient encounter, as well as after removing gloves.
Personal Protective Equipment (PPE), including gloves, gowns, and face shields, should be used when there is a risk of exposure to blood or other potentially infectious materials.
Proper disposal of sharps, such as needles and lancets, is critical to prevent needlestick injuries.
Sharps containers must be readily available, puncture-resistant, and properly labeled.
Workplace safety is paramount.
Immediate reporting of any exposure incidents (e.g., needlestick injuries) to the appropriate personnel is necessary, followed by prompt medical evaluation and treatment.
Patient Communication: Building Trust and Ensuring a Positive Experience
Effective communication is an essential component of quality patient care in phlebotomy.
A phlebotomist’s ability to communicate clearly, empathetically, and respectfully can significantly impact the patient’s experience, reduce anxiety, and improve cooperation.
Introduction and explanation of procedure is key.
Begin by introducing yourself and explaining the purpose of the blood draw in simple, easy-to-understand terms.
Address any concerns or questions the patient may have.
Empathy and reassurance are important.
Acknowledge that some patients may be anxious or fearful of needles.
Offer reassurance and support, and use relaxation techniques, such as deep breathing exercises, to help calm their nerves.
Clear instructions are helpful to the patient.
Provide clear and concise instructions throughout the procedure, such as when to make a fist or when to release the tourniquet.
Post-procedure care explanations for the patient’s benefit.
Explain what to expect after the blood draw, including potential bruising or soreness.
Provide instructions on how to care for the puncture site and when to seek medical attention.
Active listening to build trust.
Pay attention to the patient’s verbal and nonverbal cues.
Respond to their concerns with empathy and respect.
By fostering a positive and communicative environment, phlebotomists can build trust with patients and ensure a more comfortable and successful blood collection experience.
Mastering Vein Sites: Phlebotomy FAQ
This FAQ addresses common questions about vein selection and best practices for successful phlebotomy.
What are the most commonly used vein sites for phlebotomy?
The median cubital, cephalic, and basilic veins in the antecubital fossa (inner elbow) are the most common vein sites used in phlebotomy. These veins are typically large, easily accessible, and relatively stable.
Why is proper vein selection so important for successful phlebotomy?
Selecting the appropriate vein reduces the risk of complications like hematomas, collapsed veins, and nerve damage. It also increases the likelihood of obtaining a sufficient blood sample on the first attempt, minimizing patient discomfort.
What factors should I consider when selecting a vein site?
Consider the vein’s size, depth, and stability. Palpate the area to assess the vein’s resilience. Also, check for any contraindications, such as scarring, edema, or mastectomy on the same side.
What should I do if I can’t find a suitable vein in the antecubital fossa?
If antecubital veins are unsuitable, consider using veins on the dorsal side of the hand or wrist. However, these veins are generally smaller and more fragile. Always prioritize patient comfort and safety, and consult with a supervisor if needed.
So, there you have it! Armed with this knowledge of vein sites used in phlebotomy, you’re well on your way to mastering the art. Happy sticking!
